1. Diagnostics: Is It Truly a Hairline Crack?
Before you reach for the repair kit, you must categorize the crack.
- Hairline Cracks: Usually vertical or diagonal, following a straight or slightly jagged path. These are perfect for DIY repair.
- Structural Cracks: If a crack is wider than 1/4 inch, runs horizontally across the wall, or if one side of the crack is pushing inward further than the other (offset), you should consult a structural engineer. These often indicate soil pressure issues that an injection kit cannot fix.
2. Choosing Your Material: Epoxy vs. Polyurethane
When repairing foundation cracks, you have two primary chemical options. Choosing the right one depends on the “status” of the crack.
Epoxy Injection
- Best for: Structural reinforcement.
- How it works: Epoxy is incredibly strong—stronger than the concrete itself once cured. It bonds the two sides of the crack together.
- Downside: It cures slowly and must be used on dry cracks. If the crack is actively leaking water, epoxy will not bond.
Polyurethane Foam Injection
- Best for: Waterproofing and active leaks.
- How it works: This is a hydrophilic material. When it hits water or moisture inside the crack, it expands up to 20 times its volume, filling the entire void all the way to the exterior soil.
- Pro Tip: For 90% of home-bound seniors or DIYers looking to keep a basement dry, polyurethane is the preferred choice because of its flexibility and ability to handle minor foundation shifting.
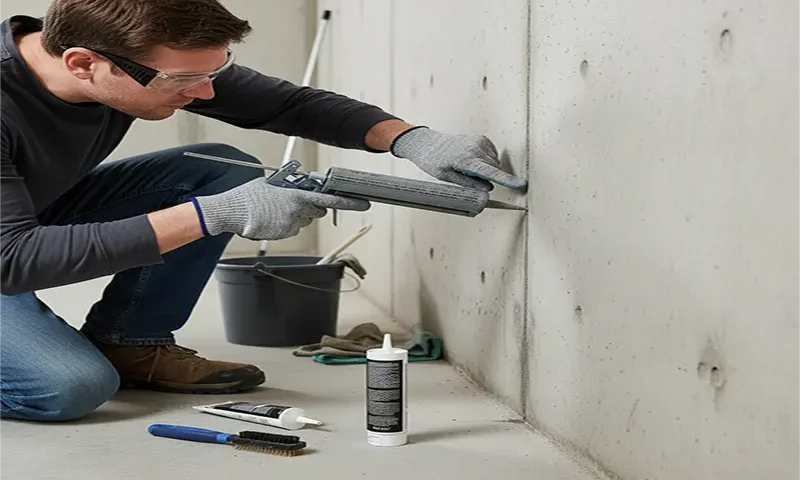
3. The Tool Kit
For a professional-grade repair, avoid “surface caulking.” Simply smearing a sealant over the crack will fail within a year as the house vibrates and breathes. Instead, purchase a Foundation Crack Injection Kit, which typically includes:
- Injection ports (plastic “T” shaped nozzles)
- Two-part surface sealer and port adhesive
- The injection material (Epoxy or Polyurethane) in a standard caulk tube format
- Wire brush and plastic putty knife
4. Step-by-Step Repair Process
Step 1: Preparation
The bond is only as good as the surface. Use a wire brush to scrub the crack and the area 2 inches on either side of it. You must remove all loose concrete, dust, and any previous “quick-fix” paint or sealants.
Note: Do not use a chisel to “widen” the crack. Modern low-pressure injection is designed to penetrate even the tightest hairline openings.
Step 2: Set the Injection Ports
Injection ports are the “gateways” for the resin.
- Space the ports roughly 10–12 inches apart along the length of the crack.
- Apply a small amount of the surface sealer/adhesive to the base of the port, being careful not to plug the hole in the center.
- Press the port over the crack. Start at the bottom of the wall and work your way up.
Step 3: Seal the Surface
Once the ports are set, you must “cap” the rest of the crack. Mix the two-part surface sealer and apply it over the entire length of the crack between the ports. Use a putty knife to feather the edges. This creates a bridge that prevents the injection resin from leaking out the front of the wall, forcing it to go deep into the foundation. Let this cure for the time specified (usually 1–2 hours).
Step 4: The Injection
- Start at the bottom-most port.
- Insert the tip of the resin tube into the port and squeeze slowly.
- Continue injecting until you see the resin begin to ooze out of the port directly above it.
- Cap the bottom port and move to the next one.
- Repeat this “stair-step” process until you reach the top of the wall.
Step 5: Finishing
After 24–48 hours, the resin will be fully cured. You can use a hammer or a hacksaw to snap off the protruding plastic necks of the injection ports. If desired, you can sand the surface sealer flush with the wall and paint over it.
5. Cost-Effectiveness and Value
- DIY Cost: $120 – $180 for a complete kit.
- Professional Cost: $600 – $1,200 per crack.
- Time Commitment: 3–4 hours of active work spread over two days.
Repairing these leaks is a high-ROI task. Beyond preventing water damage to your basement floor and belongings, a sealed foundation is a prerequisite for any future basement finishing projects.
6. Maintenance and Monitoring
After the repair, monitor the area during the next heavy rainstorm. A successful injection should show zero moisture. If you notice dampness, it may be coming from a separate entry point, such as the cove joint (where the wall meets the floor).
A hairline crack in your foundation is not a reason to panic, but it is a call to action. By using a low-pressure injection kit, you are implementing a permanent, flexible, and waterproof solution that addresses the root of the problem. This DIY project is one of the most effective ways to preserve the value of your home and ensure a healthy, dry living environment for years to come.
