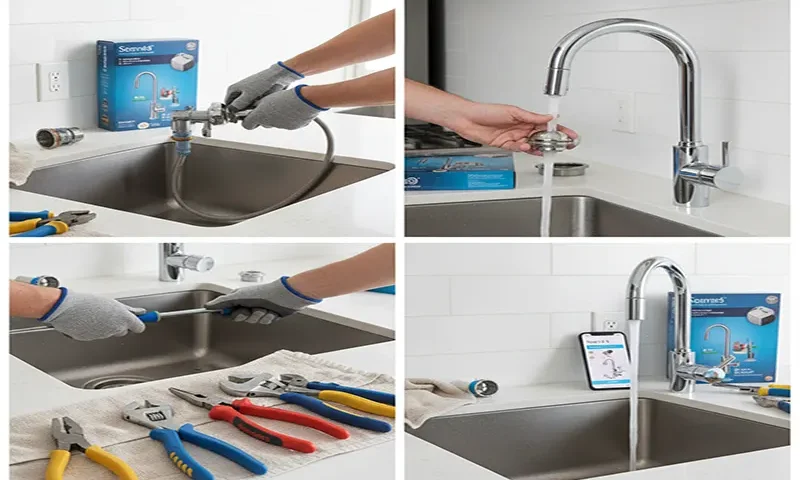
1. Tools and Materials Needed
Before you begin, gather these essential tools. Working under a sink is cramped, so having everything within reach is key.
- New Pull-Down Faucet Kit (Ensure it matches your sink’s hole configuration: 1-hole or 3-hole).
- Basin Wrench: Specifically designed to reach the mounting nuts tucked high behind the sink basin.
- Adjustable Wrench: For disconnecting and reconnecting water supply lines.
- Screwdrivers: Both Phillips and flathead.
- Flashlight or Headlamp: Crucial for visibility in dark cabinets.
- Plumber’s Tape (Teflon Tape): To ensure watertight threaded connections.
- Bucket and Towels: To catch residual water in the lines.
- Penetrating Oil (Optional): Such as WD-40, if your old mounting nuts are rusted or stuck.
2. Preparation: Safety and Space
Start by clearing everything out from under your sink. You need a clear workspace to lie down and see the connections.
- Shut Off the Water: Locate the hot and cold shut-off valves under the sink. Turn them clockwise until they are fully closed.
- Drain the Lines: Open the faucet handle to “on” to release any remaining pressure and drain standing water into the sink.
- Lay Down Protection: Place a towel and a small bucket directly under the supply lines to catch drips during disconnection.
3. Removing the Old Faucet
This is often the hardest part of the job due to corrosion and tight spaces.
- Disconnect Supply Lines: Use your adjustable wrench to unscrew the nuts connecting the faucet’s flexible tubes to the shut-off valves. Hold the valve with a second wrench if it feels like it might twist.
- Remove the Spray Hose Weight: If your old faucet was a pull-down model, unscrew or unclip the lead or plastic weight attached to the spray hose.
- Unscrew the Mounting Nut: Use the basin wrench to reach up and loosen the large nut holding the faucet to the underside of the sink. If it’s stuck, apply penetrating oil and wait 15 minutes.
- Lift Out the Faucet: Once the nut and any mounting washers are removed, pull the faucet straight up through the top of the sink.
- Clean the Surface: Use a non-abrasive scrubber to remove old putty, mineral deposits, or “gunk” from the sink holes. A clean, dry surface is essential for a good seal.
4. Installing the New Pull-Down Faucet
Most modern faucets come with pre-installed supply lines, simplifying the process.
Step A: Position the Faucet
- Single-Hole Sink: Simply drop the lines through the center hole.
- Three-Hole Sink: You will likely need to use the included deck plate (escutcheon) to cover the two outer holes. Apply a thin bead of plumber’s putty or use the provided foam gasket under the plate before setting the faucet in place.
Step B: Secure from Below
From underneath the sink, slide the mounting washer and the metal nut over the hoses. Hand-tighten the nut first to ensure the faucet is aligned correctly on top. Once aligned, use your basin wrench or the manufacturer-provided tool to tighten it until the faucet doesn’t move when you tug the handle.
Step C: Connect the Spray Hose and Weight
This is the “pull-down” specific step:
- Connect the Hose: Most use a “Quick-Connect” fitting. Push the spray hose into the outlet tube until you hear a “click.”
- Attach the Weight: Clamp the weight onto the spray hose. Placement is key: It should be high enough that it doesn’t hit the bottom of the cabinet but low enough to pull the sprayer back up. Usually, about 2-3 inches above the lowest point of the hose loop is ideal.
5. Final Connections and Testing
- Hook Up Supply Lines: Connect the hot (usually labeled red) and cold (blue) lines to your shut-off valves. Wrap the valve threads with plumber’s tape in a clockwise direction before tightening the nuts with your adjustable wrench. Do not overtighten, as this can crack the internal gaskets.
- Flush the System: Before using the sprayer, unscrew the spray head from the hose. Point the open hose into the sink and turn the water on for one minute. This flushes out any debris or solder bits that could clog your new spray head.
- Check for Leaks: Turn the valves on fully and watch the connections for 5 minutes. Check again after 24 hours.
Summary Table: Troubleshooting
| Symptom | Potential Cause | Fix |
| Leaking at valves | Loose connection or no tape | Tighten 1/4 turn or re-apply Teflon tape. |
| Spray head won’t retract | Weight is misplaced | Adjust weight higher or move obstructing items. |
| Low water pressure | Debris in the aerator | Unscrew spray head and clean the mesh screen. |
Replacing a pull-down faucet is a task that saves you the $150–$300 professional plumbing fee and gives you total control over your kitchen’s centerpiece. By ensuring your mounting nut is tight and your supply lines are flushed, your new faucet should provide years of drip-free service.
